开始看《乌合之众》

记录开始,不知道多久能看完,占坑准备日后写写读后感。

据说是一本充满偏见的书。

上一本看完的是《蒂凡尼的早餐》。

最近忙着毕业考试和论文答辩,每天忙的根本停不下来,很多想写的以后补上,FLAG已立,一定补上,再忙多看看书也是好的。

还有日剧《四重奏》也是之前看完,没时间写感想,一如既往的日式人物塑造,细腻且生动,剧情源于生活却高于生活,平和却不平淡。

博客貌似很多天没有更,也半个多月没写代码,作为新站更新频率低应该是很影响收录的T.T

收到了一位站长的友链还是蛮开心的,第一步迈出去总是好的。

没时间只是借口吧,估计博客也没几个人看(ˉ▽ ̄~)

不是大牛不是文青,权当记录真实好了。

满足藏在冰激凌里。

基于Ubuntu搭建WordPress

0x00.购买空间

腾讯云服务器

阿里云服务器

1核 1GB 1M 的50G空间的基础服务器完全可以承载小型个人博客的流量。

设置服务器管理员密码,并向服务器安装Unbuntu镜像,登陆。


0x01.安装Apache2

sudo apt-get install apache2 -y

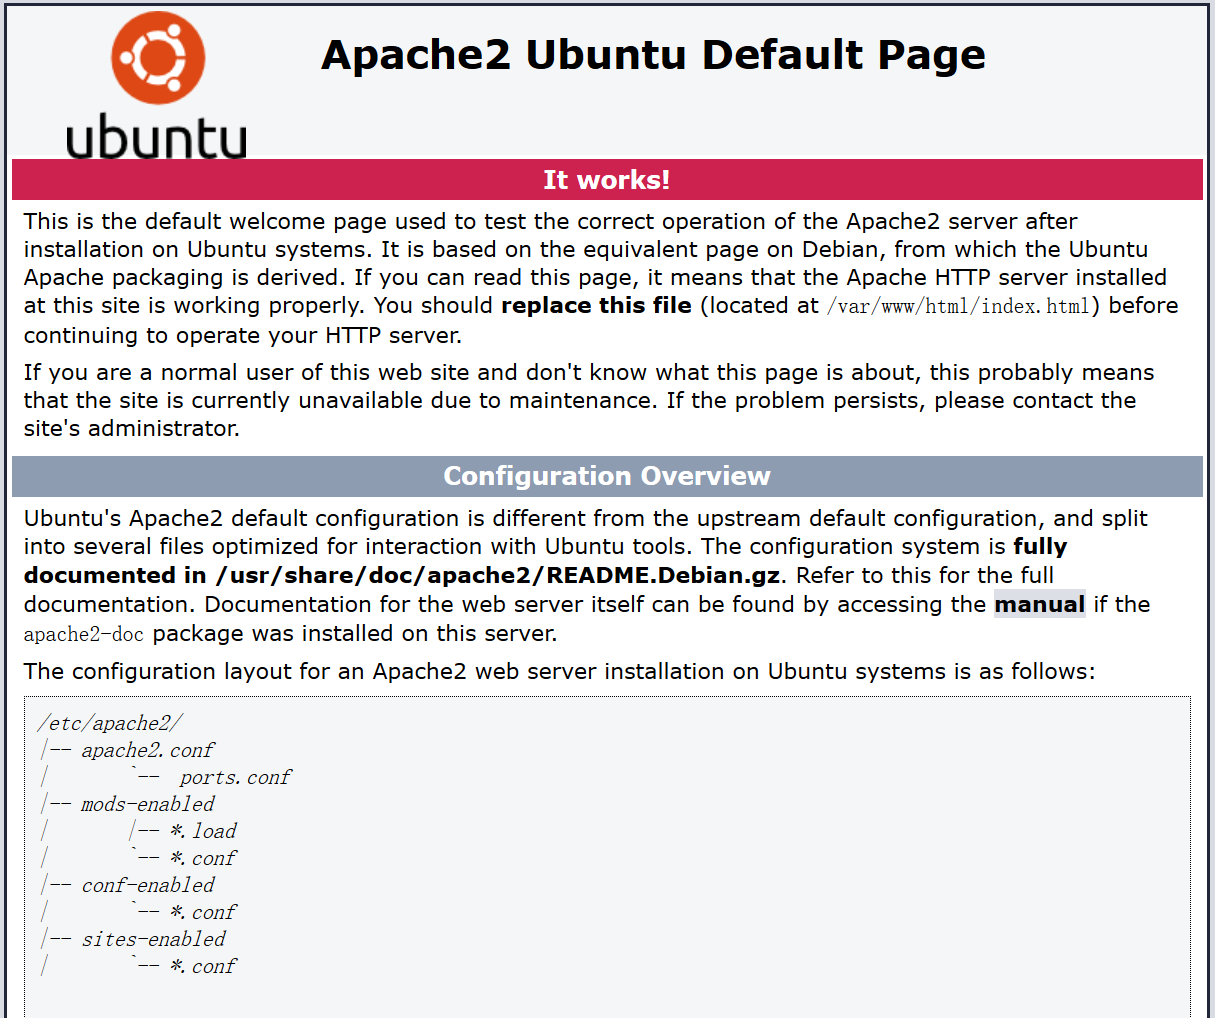
安装完成后可以通过访问服务器地址查看是否出现Apache2 Ubuntu Default Page并显示It works.

0x02.安装PHP 7.0及相关组件

sudo apt-get install php7.0 -y
sudo apt-get install libapache2-mod-php7.0

0x03.安装MySQL服务及相关组件

sudo apt-get install mysql-server -y

期间会需要输入两次密码以设置密码。

sudo apt-get install php7.0-mysql

0x04.安装 phpmyadmin

a.安装 phpmyadmin,安装过程中,遇到lighthttpd/apache2时请选择 apache2 ,再输入root密码 和数据库密码。

sudo apt-get install phpmyadmin -y

b.建立 /var/www/html 下的软连接:

sudo ln -s /usr/share/phpmyadmin /var/www/html/phpmyadmin

c.重启apache2和MySQL 服务(以后对apache2进行更改后也要重启以生效)

sudo service mysql restart
sudo systemctl restart apache2.service

0x05.安装Wordpress

wget https://cn.wordpress.org/wordpress-4.7.4-zh_CN.zip

下载完成后解压缩

sudo unzip wordpress-4.7.4-zh_CN.zip

0x06.为 wordpress 配置数据库

a.进入 mysql,输入MySQL密码:

mysql -u root -p

b.为 wordpress 创建一个叫 wordpress 的数据库

CREATE DATABASE wordpress;

c.数据库设置一个用户 wordpressuser,并设置密码:password123

CREATE USER wordpressuser;
SET PASSWORD FOR wordpressuser= PASSWORD("password123");

d.给用户数据库的访问权限并生效配置

GRANT ALL PRIVILEGES ON wordpress.* TO wordpressuser IDENTIFIED BY"password123";
FLUSH PRIVILEGES;

e.退出Mysql

exit;

0x07.配置Wordpress

a.把 wordpress 文件夹里的文件都复制到 /var/www/html/ 文件夹

sudo mv wordpress/* /var/www/html/

b.修改权限

sudo chmod -R 777 /var/www/html/

c.将apache指定到index.html

sudo mv /var/www/html/index.html /var/www/html/index~.html

d.重启apache

sudo systemctl restart apache2.service

0x08.测试访问

输入服务器地址访问。


0x09.购买域名并添加解析

以腾讯云举例

腾讯云域名选购

选购好域名后,登陆云服务器控制台,选择要添加解析的域名,点击添加解析→新手快速添加→网站解析→输入要云服务器IP→确定

Ubuntu下修改wordpress上传文件限制

0x00.编辑php.ini

编辑php.ini文件.(可能在 /etc/php.ini 或者 /etc/php.d/cgi/php.ini 或者 /usr/local/etc/php.ini)

我的php.ini在etc/php/7.0/apache2下

vi /etc/php/7.0/apache2/php.ini

0x01.修改max值

upload_max_filesize = 64M
memory_limit = 64M 
post_max_size = 64M

0x02.重启apache服务

sudo /etc/init.d/apache2 restart


UWP控件Navigationview

0x00.规范布局

微软通过秋季更新发布了 NavigationView 控件。在此之前,实现汉堡菜单多使用Nuget上发布的类库或使用Splitview自制,但无法保持风格的一致性。

MSDN给出的实例

<NavigationView SelectionChanged="SelectionChanged">
  <NavigationView.MenuItems>
    <NavigationViewItemHeader Content="Section A" />
    <NavigationViewItem Content="Item 01" />
    <NavigationViewItem Content="Item 02" />
  </NavigationView.MenuItems>
  <Frame x:Name="NavigationFrame" />
</NavigationView>

0x01.模式

控件有三种可能的模式:最小、紧凑和扩展,每种模式都是基于带有阈值的内置和可自定义视图自动选择的。


0x02.NavigationViewItem

NavigationViewItem为NavigationView.MenuItems中item项,包含Icon,Content,Tag等常用属性。

Icon:参阅Segoe MDL2 icons提供的图标。

IsSelected:NavigationViewItem是否被选中,选中的NavigationViewItem左侧会有指示方块。如果出现默认需要选中的NavigationViewItem没有指示方块并且已设置IsSelected=true

请为NavigationViewItem添加Loading事件即可正常显示。

private void NavigationViewItem_Loading(Windows.UI.Xaml.FrameworkElement sender, object args)
{
    ((NavigationViewItem)sender).IsSelected = true;
}

0x03.NavigationViewItemSeparator

用于分隔两个NavigationViewItem。


0x04.IsSettingsVisible

Pane底部的Setting按钮是否可见。


0x05.IsPaneOpen

Pane是否展开。


0x06.SelectionChanged事件

当NavigationView中选中的NavigationViewItem改变时触发,常配合Frame控件实现导航视图。

<NavigationView x:Name="NaviView" 
                SelectionChanged="NaviView_SelectionChanged">
    <NavigationView.MenuItems>
        <NavigationViewItem Icon="Home" Content="首页" Tag="Index"/>
        <NavigationViewItem Icon="BrowsePhotos" Content="搜索" Tag="Filter" />
    </NavigationView.MenuItems >

    <Frame x:Name="RootFrame">
      <Frame.ContentTransitions>
        <TransitionCollection>
          <NavigationThemeTransition/>
        </TransitionCollection>
      </Frame.ContentTransitions>
    </Frame >
</NavigationView >
private void NaviView_SelectionChanged(NavigationView sender, NavigationViewSelectionChangedEventArgs args)
{
        NavigationViewItem item = args.SelectedItem as NavigationViewItem;
        switch (item.Tag)
        {
            case "Index":
                RootFrame.Navigate(typeof(Pages.Index_Page));
            break;

            case "Filter":
                RootFrame.Navigate(typeof(Pages.Filter_Page));
            break;

            case "Setting": 
                RootFrame.Navigate(typeof(Pages.Setting_Page)); 
            break;
        }
}


WordPress安装自定义字体

0x00.下载所需字体 ,确保FTP服务器可用


0x01.将字体文件上传至FTP服务器


0x02.在主题目录下新建fonts文件夹

mkdir fonts

0x03.复制字体文件至fonts文件夹

cp xxx.ttf /www/wwwroot/async.website/wp-content/themes/xxx/fonts

0x04.修改fonts文件夹权限

chmod -R 777 fonts

0x05.在主题的style.css中添加@font-face

@font-face {
  font-family: xxx; 
  src: url(https://xxxx.xxx/wp-content/themes/xxx/fonts/xxx.ttf); /*修改url为自己的字体路径*/
  font-weight: normal; 
}

0x06.在所需地方引用,如需要修改style.css中site-description的字体

.site-description {
  display: inline-block;
  margin-top: 15px;
  margin-bottom: 0;
  font-size: 50px;
  font-family:Debby;
  line-height: 1.1;
}


UWP 使用BackgroundTransfer下载图片

 0x00.添加引用

using System;
using System.Threading.Tasks;
using Windows.Networking.BackgroundTransfer;
using Windows.Storage;

0x01.下载

Uri uri = new Uri(imageUri);//需要下载图片的Uri,exp:http*****.jpg
BackgroundDownloader backgroundDownload = new BackgroundDownloader();
StorageFolder folder = await KnownFolders.PicturesLibrary.CreateFolderAsync("Acafe", CreationCollisionOption.OpenIfExists);//此处为下载路径,可是要Openfolder改为自定义路径
StorageFile newFile = await folder.CreateFileAsync(imageName, CreationCollisionOption.OpenIfExists);//创建文件,需要定义文件名
DownloadOperation download = backgroundDownload.CreateDownload(uri, newFile);//创建下载器
await download.StartAsync();//启动


UWP 自定义Popup控件的自适应

0x00.前提

自定义了一个查看图片细节的控件,本质是一个Image控件,但是应为采用了左侧为NavigationView右侧为Frame的导航模式,为了使该控件能覆盖到左侧的NavigationView之上,只能采用Popup。

这也导致该控件的容器不能是Frame/Page中的Grid,从而不能直接随窗体一起拉伸,可以采用SizeChanged事件和INotifyPropertyChanged接口来实现,也可使使用MeasurePopupSize()


0x01.实现

public Image_Detail()
{
    this.InitializeComponent();
    _popup = new Popup();
    ApplicationView.GetForCurrentView().VisibleBoundsChanged += (s, e) =>
    {
        MeasurePopupSize();
    };
    MeasurePopupSize();
    _popup.Child = this;
}

private void MeasurePopupSize()
{
    this.Width = ApplicationView.GetForCurrentView().VisibleBounds.Width;
    this.Height = ApplicationView.GetForCurrentView().VisibleBounds.Height;
}

C# Json反序列化

0x00.使用工具将Json格式化

Json作为一种数据交换格式,具有简洁和清晰的结构。
在线Json格式化校验工具:http://tool.chinaz.com/tools/jsonformat.aspx

在线转换C#类工具:http://json2csharp.chahuo.com/

Json数据
{
    "code": "00",
    "count": 1,
    "followersList": [
        {
            "followerDate": "2017-11-29 11:11:10",
            "follower_id": "WEP2DU",
            "userIconPath": "http://www.sonystyle.com.cn/mysony/acafe/myspace/images/space/default.gif"
        }
    ],
    "programId": 1,
    "userId": "YIOMOOOO"
}
使用C#类工具转换后新建一个”JsonFollower”类
class JsonFollower
{
    public class FollowersList
    {
        public string followerDate { get; set; }
        public string follower_id { get; set; }
        public string userIconPath { get; set; }
    }

    public class RootObject
    {
        public string code { get; set; }
        public string count { get; set; }
        public List<followerslist> followersList { get; set; }
        public List<followering> following { get; set; }
        public string programId { get; set; }
        public string userId { get; set; }
    }
}

0x01.添加引用

using System.Collections.Generic;
using System.Net.Http;
using Newtonsoft.Json;//在Nuget中下载对应类库

0x02.模拟发送请求获取Json

HttpClient request = new HttpClient();
HttpResponseMessage MyFolResponse = request.GetAsync("http://www.sonystyle.com.cn/mysony/campaign/api/program.do?methodName=getMyFollowersList&programId=1" + "&userId=YIOMOOOO").Result;
string a = MyFolResponse.Content.ReadAsStringAsync().Result;
JsonFollower.RootObject rb1 = JsonConvert.DeserializeObject<JsonFollower.RootObject>(a);

0x03.遍历RootObject并转化为对象

List<FollowerInfo> FolInfo = new List<FollowerInfo >();
List<string> followerDate = new List<string>();
List<string> follower_id = new List<string>();

foreach (JsonFollower.FollowersList fl in rb1.followersList)
{
    followerDate.Add(fl.followerDate);
    follower_id.Add(fl.follower_id);
}

for (int i = 0; i < follower_id.Count; i++)
{
    FollowerInfo FI = new FollowerInfo();
    FI.followerDate = followerDate[i];
    FI.follower_id = follower_id[i];
    FolInfo.Add(FI);
}
return FolInfo;

UWP 设定图片为桌面/锁屏

0x00.添加引用

using System.Collections.Generic;
using System.Linq;
using System.Threading.Tasks;
using Windows.UI.Xaml;
using Windows.UI.Xaml.Controls;
using Windows.UI.Xaml.Controls.Primitives;
using Windows.UI.Xaml.Input;
using Windows.Storage;
using System;
using Windows.System.UserProfile;
using Windows.ApplicationModel;
using System.Collections.ObjectModel;
using Windows.UI.Xaml.Media;

0x01.选择图片

FileOpenPicker openPicker = new FileOpenPicker();
openPicker.ViewMode = PickerViewMode.Thumbnail;
openPicker.SuggestedStartLocation = PickerLocationId.PicturesLibrary;
openPicker.FileTypeFilter.Add(".jpg");
openPicker.FileTypeFilter.Add(".jpeg");
openPicker.FileTypeFilter.Add(".png");

var file = await openPicker.PickSingleFileAsync();

0x02.复制所选图片并设定

if (!UserProfilePersonalizationSettings.IsSupported())
{
    MessageDialog md = new MessageDialog("Not Support");
    md.ShowAsync();
}
else
{
    StorageFolder base_folder = await Package.Current.InstalledLocation.GetFolderAsync("Assets");//选择App安装目录下Assets文件夹作为复制目录
    await file.CopyAsync(base_folder,file.Name, NameCollisionOption.ReplaceExisting);//将选择的图片复制到base_folder
    StorageFile copy_file = await StorageFile.GetFileFromApplicationUriAsync(new Uri("ms-appx:///Assets/" + file.Name));

    UserProfilePersonalizationSettings setting = UserProfilePersonalizationSettings.Current;
    await setting.TrySetWallpaperImageAsync(copy_file);//设置为壁纸,返回true成功,false失败
    await setting.TrySetLockScreenImageAsync(copy_file);//设置为锁屏,返回true成功,false失败
}

PS.如不将所选文件复制至App目录下会出现权限问题

Jumony.Core爬虫学习 [1]

 0x00.Nuget 中下载 Jumony.Core 安装至当前项目

0x01.获取http://www.sonystyle.com.cn/mysony/acafe/index.htm 首页滚动图片URL

foreach (var img in new JumonyParser().LoadDocument("http://www.sonystyle.com.cn/mysony/acafe/index.htm/",Encoding.GetEncoding(65001)).Find("[target=_blank]>img[src*=\"index\"]"))<br> textBox.Text = textBox .Text + "http://www.sonystyle.com.cn/mysony/acafe/" + img.Attribute("src").Value() +" \n";


PS. 注意head 中页面的编码信息注意转码

CSS选择器 http://www.w3school.com.cn/cssref/css_selectors.asp